


In this post, let’s see how to use Azure Content Delivery Network (CDN) to cache content from Azure Storage.
You would need to have an Azure account with an active subscription. If you do not have it yet, you can create one for free. And then sign in to the Azure portal.
Create Storage Account
A storage account is used to get access to Azure storage services like File Storage, Blobs, Tables and Queue storage.
To create a new storage account, search Storage Accounts in top menu search box and then select Storage Accounts from the search results. It would open the list showing all existing storage accounts. Then click on Add button to add a new storage account.
Provide below inputs on the first panel of create storage account wizard:
- Subscription, a valid subscription under which resource should be created
- Resource Group, the logical container for the resource
- Storage Account Name, the name of storage account which is
democdnsa - Location, the geographical region where the storage account should be created
- Performance, which pricing tier you want to use. Keep this default.
- Account Kind, General Purpose V2
- Replication, Locally redundant storage
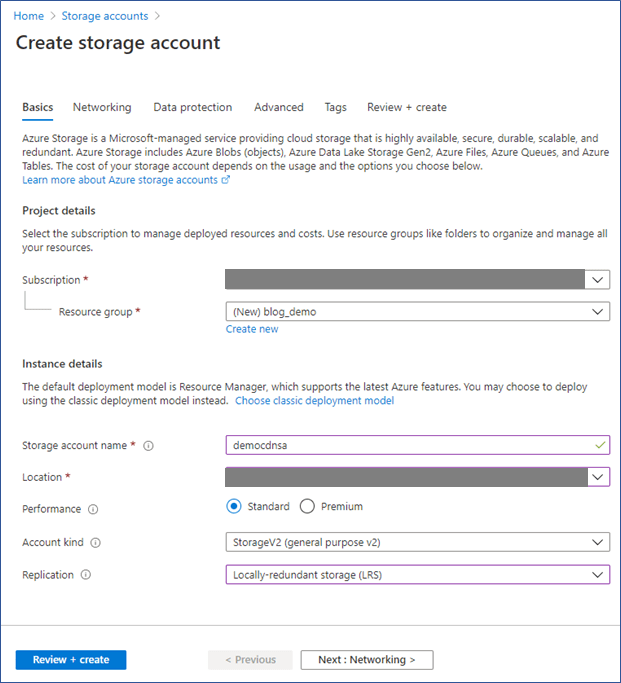
Then click on Review + Create button which would trigger validation of inputs. If validation is successful, you can click on Create button to start creation of resource. The storage account would be ready to use almost instantly.
Enable Azure CDN
We have a storage account created already. Now, the next step is to enable the Azure CDN for the storage account.
Navigate to the newly created storage account and search for CDN. Select Azure CDN option from left navigation. Then provide the below inputs:
- CDN Profile, select
create newoption - CDN Profile Name, provide
demo-cdn-profile - Pricing Tier, provide any standard tier (like
Standard Microsoft) - CDN endpoint name, the name for the endpoint. Enter
demo-cdn-profile-endpoint-sa


Then click on Create button. The CDN endpoint would be created almost instantly.
Once the endpoint is created, it would be shown on the same page as shown in the below snapshot. Once CDN is enabled, all public blobs would be eligible for CDN caching.


Access Contents
Now that the CDN is enabled on the storage account, the contents of storage account can be accessed via CDN. As you know, the blobs are placed inside the container. So the URL that should be used to access the contents from CDN would be http://{endpoint-name}.azureedge.net/{container}/{blob-name}.
If you know about the storage accounts and blobs, you might already be knowing that the storage account contents can already be accessed via a URL.
So what difference does this new azureedge URL makes ? As stated earlier, the CDNs cache the contents closer to the users, thus help reducing latency. Meaning the azureedge URL would find the nearest best performing POP instead of going to actual storage account’s physical location.
A point to note, if you modify the object which is being cached in CDN, then the CDN would still hold the cached objects (previous state) until TTL expires.
Remove Contents from CDN
If you want to stop caching contents at CDN, then you have 3 options:
- Make the blob private. Only public blobs are eligible to be used with Azure CDN
- Disable or Delete the CDN endpoint
- OR modify application to not use the CDN URLs
If you just makes the blob private, the objects cached till that point in CDN, would still be served via CDN until TTL expires or until the CDN endpoint is deleted. After TTL is expired, the CDN will check if the endpoint is still valid and if the blob objects are still public and anonymous. If they are not, then the CDN would not further cache the objects.
I hope this article was helpful. Let me know your thoughts.


